Monthly Archives: August 2024

Winter Gardener’s Calendar

A perfect time to plan! Curl up with your gardening books and the gardening magazines and catalogs you’ve received in the mail. Get out the gardening journal and start dreaming…

General Landscape

  • Clean up when you get a break in the weather. Remove fallen branches and downed evergreen clumps. Rake leaves to prevent stains on concrete and dead patches on lawn. If freezing weather is still in the forecast, leave the mulch in place.
  • If your Christmas tree is still around, set it where the dropping needles will provide mulch, use the branches as additional insulation for perennials, or get together with neighbors to rent a chipper and create wood chips for larger mulch.

Houseplants

  • Perk up tired houseplants by removing dead and dying leaves. Wash under a soft shower in the sink or tub.
  • Spider mites love living in warm dry winter homes. Check for mites by looking for tiny speckles on leaves.
  • Transplant if roots are growing through the drainage holes or over the pot edge. Pick up some new larger trend-setting colored pots to perk up your décor. Or, if you don’t want to move into a larger pot, untangle the roots and cut back by 1/3, scour the pots and replant with new soil.
  • Remember to turn your plants each week as they begin to grow towards the weaker window light.
  • Plant a terrarium or miniature garden. If you can’t play in the dirt outside, bring the fun indoors!
  • Pick up Valentine flowers. We have a fragrant and beautiful assortment of red, pink or white flowers. Come in and choose from cyclamen, miniature roses, orchids, and other colorful flowers that are the perfect “I love you!”

Vegetables:

  • Plant short-term cover crop such as Fava beans when soil becomes workable.
  • February: Start vegetable and herb seeds indoors:
Broccoli
Cabbage
Celery
Chard
Eggplant
Kale
Kohlrabi
Leeks
Lettuce
Onions, bulb
Peppers
Radicchio
Scallion
Spinach
Tomatoes
Turnip

General:

If you just need a breath of aromatic fresh garden air, stop by and smell ours! The humidity is perfect and will instantly transport you to spring. While here, check out the latest trends in gardening colors, containers, new plant varieties and tools. Of course, we also have a wide selection of books to provide ideas. If you have any questions or need suggestions, we’re here to help. We’d love to see you!

Early Spring Gardener’s Calendar

* Plan your summer vegetable and herb garden. We offer a wide selection of seeds that include all of your favorite annuals, perennials, vegetables and other novelties as well as many hard-to-find selections. Inventory your pots and flats and discard unusable ones. Make a list of the supplies you will need. Have your garden soil tested for nutrient content. We offer a variety of do-it-yourself soil test kits.

* Prune woody plants while dormant, including fruit trees, summer- and fall-blooming shrubs and vines. Limit pruning of spring-blooming trees and shrubs to the removal of sucker growth and rubbing or broken branches. Spray trees and shrubs with year-round horticultural oil to reduce insect population.

* Sharpen, clean and oil tools and lawn mowers. Begin heavy annual pruning of shrub roses as new leaves appear.

* Plant pansies, English daisies and primrose as soon as the earth is workable. Plant strawberry plants. Sow cool-season vegetables and herbs in the garden.

* Start spring cleanup and begin major lawn work. Remove debris, dethatch your lawn or aerate compacted areas to improve water penetration.

* Spray needles and limbs of Arborvitae, Cryptomeria, false cypress, fir, hemlock, Juniper, pine, yew and spruce (except blue spruce) for spider mites with year-round horticultural oil.

* Apply fertilizer to perennials and roses with. Feed berry bushes, grapevines, rhubarb and asparagus a balanced 10-10-10 fertilizer before new growth begins. Fertilize trees and shrubs.

*Apply crabgrass preventer with fertilizer to feed the lawn and control crabgrass. Do not use on newly seeded lawns.

* Continue spring cleanup. Cultivate to remove winter weeds and debris from the planting beds. Apply corn gluten or a pre-emergent herbicide with fertilizer specified for gardens and scratch it in to prevent future weeds. Do not use in gardens where you will be direct seeding.

* Reseed bare spots in established lawns. Keep the area moist until seedlings appear, then mow when the new grass is 3? high.

* Prune forsythia and other spring-flowering trees & shrubs after the flowers fall.

* Dig and divide crowded early spring bulbs after they finish blooming. Enrich the soil with bone meal.

* Plant and transplant trees and shrubs, including roses, ground covers, and perennials.

* Transplant cool-season seedlings into the garden. When the soil temperature reaches 60 degrees, sow warm-season vegetable and herb seeds.

* Place gro-thru sets over peonies, grasses or any other perennials in need of support.

Summer Gardener’s Calendar

Continue planting trees, shrubs, perennials, annuals, vegetables and herbs. Consider adding some exotic color to your deck or patio with tropical blooming plants. We have a great selection of color this summer.

It’s time for your houseplant’s summer vacation! Take outside to a shady place. Repot if necessary, fertilize and check for pests and diseases. They’ll thrive in their outdoor location all summer. Be sure to bring them back inside in early fall.

Water plants and lawns deeply during periods of dry weather. Annuals, perennials, vegetables, trees and shrubs should be watered with a slow trickling or soaker hose. Pay extra attention to plants in containers and hanging baskets – check them regularly. Remember that clay pots dry out faster than plastic.

Apply a 2-3″ layer of mulch on your garden beds in preparation for summer. Mulch conserves valuable moisture in the soil, helps keep weeds down, maintains even soil temperatures, and gives an attractive finishing touch to your beds and borders.

Spray azaleas, Pieris japonica, laurel and Rhododendron with Bonide All-Season Oil to control lacebug. Spray early in the morning or evening when temperatures are moderate and there is no rain in the forecast.

Warm, humid weather encourages the development of fungal diseases such as Black Spot and Powdery Mildew on roses. Water roses in the early morning and avoid overhead watering if possible. Clean up any fallen leaves and follow a regular fungicide spray program. We recommend the Bayer Rose and Flower All in One for good control of fungus diseases.

Prune evergreens such as pines, cypress, hollies, euonymus and boxwood, to shape as needed. Remove faded flowers of annuals regularly, to encourage more flowers. Annuals will also benefit from regular applications of a water-soluble fertilizer right through summer.

Attract hummingbirds and butterflies to your landscape by planting Butterfly Bush, Bee Balm (Mondarda), Hardy Hibiscus, Lobelia, Scabiosa and Coreopsis.

Ornamental Cabbage & Kale

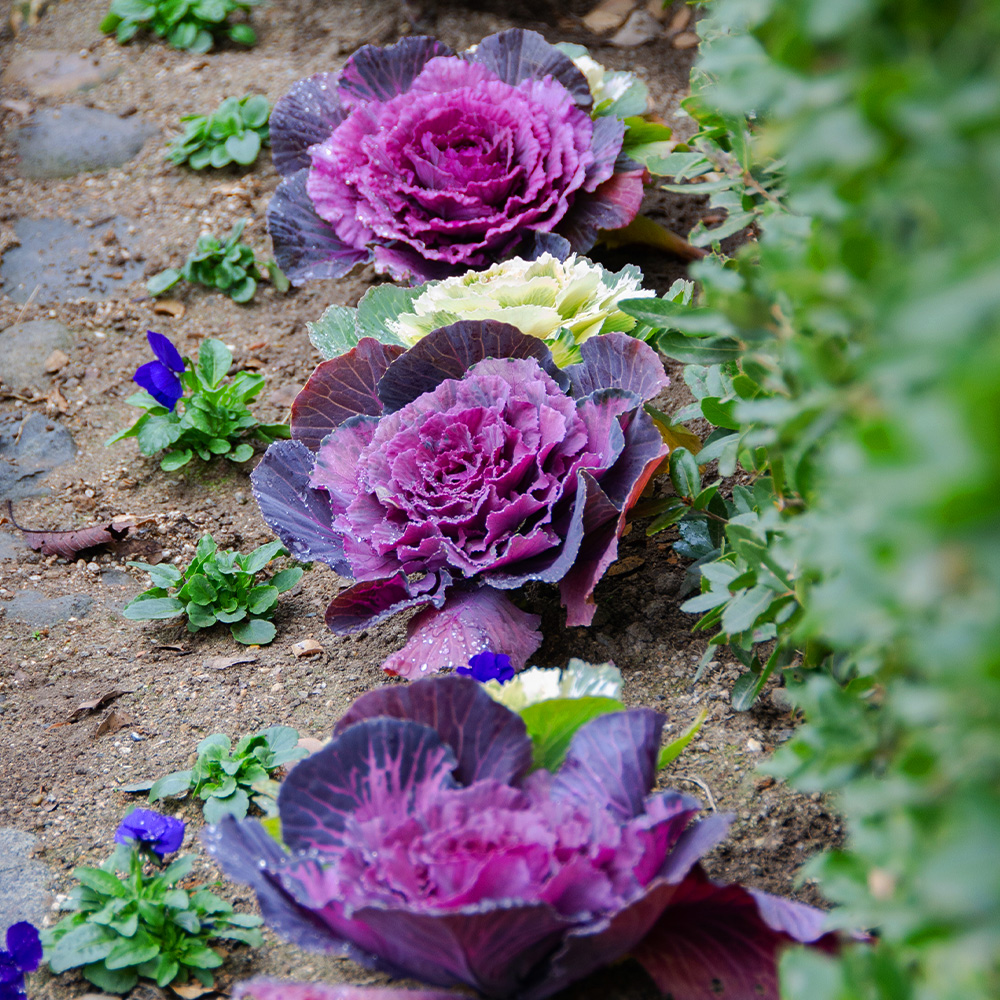
Looking to add extra appeal to the fall and winter landscape? This year, try ornamental cabbage and kale! Planted alongside chrysanthemums and winter pansies, ornamental cabbage and kale add distinctive bold texture and vibrant seasonal color to the late-season landscape.

Foliage not Flower

Frequently called ‘flowering’ cabbage & kale, these fall favorites are not flowers at all, but large, dense rosettes of colorful, frilly foliage richly variegated with cream, white, green, pink, rose, and purple – the perfect fall palette.

  • Kale leaves are frilly-edged and sometimes deeply cut or lobed.
  • Cabbage leaves tend to have a smoother appearance with a wavy leaf edge.

While the typical large ornamental cabbage and kale varieties are readily available at this time of year, you can also try more unusual options, including dwarf varieties, suitable for planters, and upright, tall, long-stemmed varieties that are useful in fall floral arrangements.

Unlike most other fall ornamentals, these cold-tolerant annuals improve in appearance after a frost or two, bringing out more intense and brilliant colors in their foliage – perfect for use as both an autumn accent plant mixed with other fall favorites or as a specimen plant, commanding all the attention. Initially select your ornamental cabbage and kale for the leaf texture as the true leaf color will not be recognized until after temperatures have cooled down quite a bit.

Our favorite tried and true varieties include:

Cabbages

  • Color Up
    Grows upright with green leaves surrounding a center of white, pink, or magenta.
  • Osaka Cabbage
    A compact plant with large, smooth, wavy leaves boasting a center of white, pink, or jewel-toned purple.

Kales

  • Crane
    When grown close together, Crane is a tall variety, perfect for cutting and using in floral arrangements.
  • Peacock
    This extra fancy variety sports deeply cut, frilly, loose leaves in purple, magenta, and white.

Planting

Popular in fall borders, grouped in planting drifts, or planted in containers for the deck or patio, ornamental cabbage and kale typically grow to 12-18” high and wide, depending on the cultivar. Plant these fall jewels in September and early October, at least 12” apart, depending on the variety, in an area with full sun that has rich, moist, well-drained soil.

  • In Ground
    If planting in the ground, add a shovel full of compost to each planting hole to enrich the native soil. Also, sprinkle in a small handful of starter fertilizer to get your cabbage and kale off to a healthy start.
  • In Containers
    When planting in pots, planters, urns, and window boxes, it is best to plant using lightweight, nutritious potting soil. Don’t forget the fertilizer! A slow-release fertilizer will feed your plants, with no additional effort, all season long.

Cabbage and Kale Tip

While these plants are quite similar to the cabbage and kale cooked in the kitchen and consumed in salads, soups, and stews, it is important to note that ornamental varieties are cultivated for color and shape rather than taste. If you’d like to use them in the kitchen, use them as a garnish only. They are more attractive than tasty, and their proper place is in the garden.

Enjoy your ornamental cabbage and kale during the cold months of the year as once they begin to bolt in the spring, sending up their flower stalks, it is time to pull them up and replace them with late spring and summer flowering annuals. This fall, however, try several new varieties planted in both containers and directly into the garden. You’ll love the long-lasting color that they’ll bring to your surroundings.


Building A Simple Raised Bed

It’s a bittersweet time of year. Frost has put to rest another growing season. It is a time for endings as we clean up the garden and jot down this year’s successes and failures. It is also a time for new beginnings, such as planning and anticipating next year’s garden.

For those who love gardening, the season does not have to end when the cold arrives. The chilly, late-season air is perfect for getting outside and beginning garden projects like building a raised bed garden. A little work now will go a long way come spring.

Why Raised Beds

Just about any plant that is grown in an in-ground garden may be cultivated in a raised bed; this includes flowers, fruits, vegetables, and herbs. Raised bed gardening offers several advantages over growing in the ground; these include:

  • Improved soil conditions
  • Earlier planting
  • Easier maintenance
  • Decreased garden pests
  • Higher crop yield

Building a Simple Raised Bed

Raised beds are available in various styles, materials, and sizes. They may be purchased complete or in DIY kits. If, however, you are adventuresome and thrifty, building your own raised garden bed from scratch is the way to go.

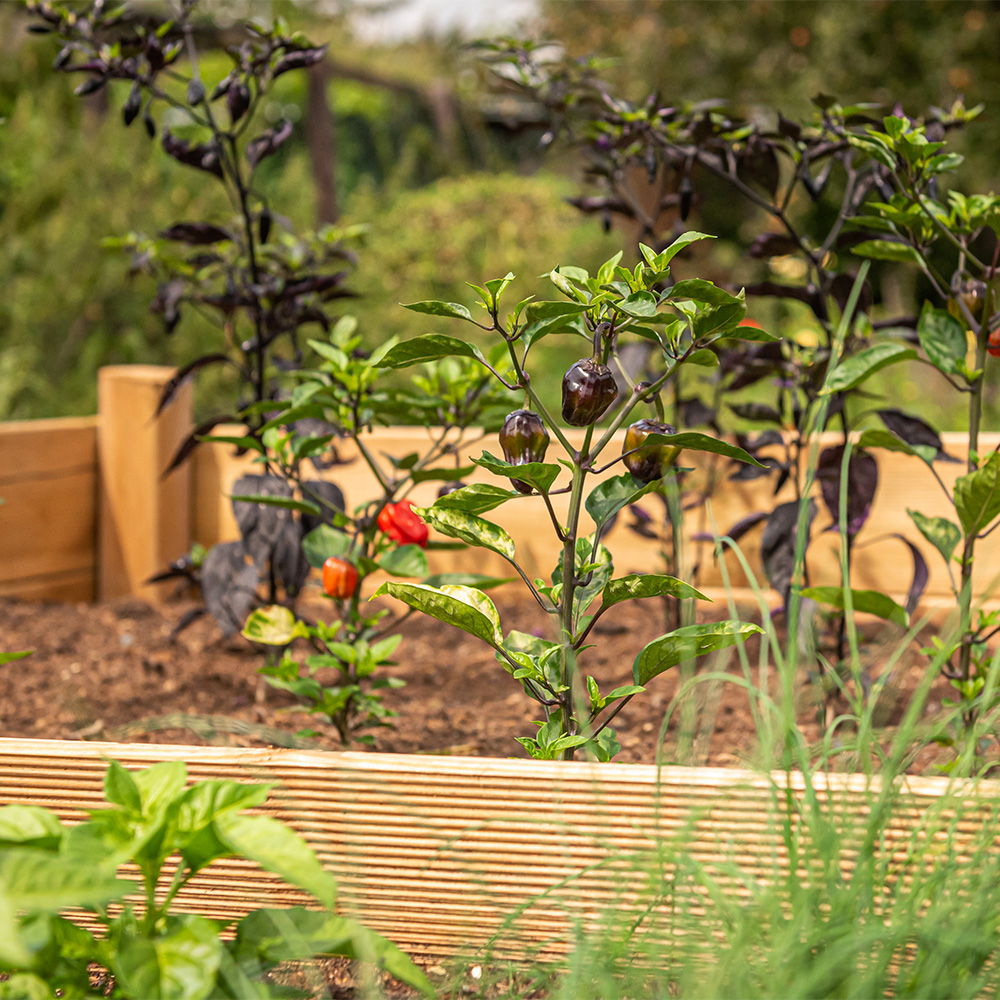
A home-built raised bed can be made to any size you choose; however, it is best to build the bed no wider than 4 feet. Optimal for ease of planting and maintaining, a raised garden of 4 feet wide will ensure you will never have to stretch further than 2 feet into the bed, a comfortable reach for most.

Materials for a Simple DIY 4′ x 8′ Raised Bed

A 4′ x 8′ raised garden bed is a perfect size. It will provide plenty of room to grow a variety of vegetables, including peppers, tomatoes, lettuce, carrots, radishes, cucumbers, and more. Whereas lettuce only requires a 6-inch soil depth to accommodate its root system, tomatoes, kale, cucumbers, squash, and zucchini need about 16 inches. We recommend building your bed at least 18 inches deep to accommodate plants with a heftier root system.

Note: All wood is not equal. For your bed’s longevity, we recommend using either cedar or white oak. We do not recommend using pressure-treated lumber for a raised bed where edibles will be grown.

Materials

6 pieces of 2” x 10” x 8′ boards

4 pieces of 2” x 2” x 24′ wooden stakes

Deck screws

Table Saw

Electric Drill

Electric Screwdriver

Let’s Prepare

  • Gather your supplies and tools, borrowing tools if necessary.
  • Select a full sun site with level ground convenient to a water source.
  • If the selected site is lawn, mow it short and cover it with landscape fabric or a thick layer of cardboard or newspaper to help suppress weeds.
  • To save time and energy, work directly in the area where the raised bed will be situated.

Let’s Build

  • Cut 2 of the boards in half, creating four 4′ pieces. Leave the remaining four boards uncut at 8′.
  • Form a rectangular frame with 2 of the 4′ boards and 2 of the 8′ boards.
  • Pre-drill screw holes that will be used to secure the corners – 4 per corner.
  • Fasten the boards together with the deck screws.
  • Repeat with the remaining boards.
  • Lay one frame over the selected site.
  • Mark the 2” x 2” x 24” stakes with a line 8 inches from the pointed tip of the stake.
  • On the inside of one of the corners of the frame, pound a 2” x 2” stake into the ground up to the 8” line. This will leave 16 inches above the ground.
  • Insert a stake directly inside the frame at the remaining three corners of the bed and pound them into the ground at the 8” line.
  • With the deck screws and drill, secure the frame to the stakes.

Preparing The Raised Bed

Fill

Now is not only the perfect time to build a raised bed but to fill it as well with high-quality topsoil amended with plenty of compost. YOUR GARDEN CENTER will assist you in calculating the amount of soil your specific bed size requires.

Feed

Organic fertilizers are naturally slow-release. Fertilize your raised bed at soil filling time, and it will be perfect for planting come spring. Select a fertilizer specifically recommended for the crop that you will be growing.

Protect

Soil should never be left exposed to the elements. Be sure to cover your prepared raised bed soil during the winter. Place a thick layer of salt marsh hay, straw, or leaves atop your soil and leave it in place until ready to plant in the spring.

Late fall and early winter are the perfect times to build and fill a raised bed. Addressing this late-season chore will keep you gardening in the colder months, assuring that your muscles remain active and will leave you with a lighter workload when spring arrives.


The Fall Herb Garden

The end of the summer doesn’t mean the end of deliciousness from your garden, not when a fall herb garden can add tantalizing tastes to all your meals. As the season changes, give your herbs a little tender loving care to ensure that they thrive through fall and into winter.

Caring for Perennial Herbs

Perennial herbs that are already established in the garden can easily be winterized, including mint, oregano, thyme, chives, rosemary and sage. So long as the herbs are healthy and thriving as summer wanes, they can be prepared for winter.

First, stop fertilizing herbs in August so they do not continue to produce delicate new growth. Continue to water them adequately, however, as drought stress will make the plants less able to tolerate winter. As their growth slows, trim each plant carefully, using sharp, clean shears for crisp cuts that will minimize strain on the plant. Prune herbs to 4-6 inches in height. It is a good idea to add a layer of mulch to insulate plant roots in colder climates.

Planting Herbs in Autumn

Cool-weather herbs, annual or perennial, can easily be planted in autumn and will be ready to flavor many savory dishes. A container herb garden is an ideal choice for fall herbs since it can be easily moved and protected for the best care. Choose a container with suitable size and depth to nurture the desired herbs, and ensure it has adequate drainage holes to promote good drainage.

Planting several herbs in the same pot will save space and keep them all close by for easy use. You may also consider using smaller pots that can be grouped together in an attractive arrangement. Pots can be positioned right near the kitchen or patio door for easy access, or in a sunny window box.

Protecting Herbs in Winter

Annual herbs or newly planted perennial ones can be at risk if a hard freeze or unexpected storm arrives. Staying alert to weather forecasts and keeping a keen eye on the barometer will help you protect your herb garden as the season deepens. If the temperature is dropping, it is best to shelter your herbs with sturdy covers, cold frames, or cloches. Moving pots or containers temporarily into an insulated garage and near an interior wall that will be warmer can also protect them from cold snaps.

If container herb gardens can safely remain outdoors in the late fall, the pots should be elevated so their drainage holes do not become clogged. Pot feet or plant stands are great options and will help keep the soil from becoming too damp after repeated rains or snows.

Trimming plants into dome shapes is another way to protect the fall herb garden from the onslaught of winter weather. A more compact shape will shed rain and snow more effectively, providing better protection for the plant’s structure and minimizing damage. A dome shape will also be easier to cover if necessary.

Dishes for a Delicious Fall

Fresh herbs add subtle flavors to salads and can be used to season roasts and meats. Infusing soups, sauces, and gravies is another way to create layers of flavor in autumn foods, and herbs can even add unique notes to hot teas, fruit compotes and jellies, or spiced cider. The better you protect your fall herbs, the more you will be able to enjoy them throughout the season and well into winter.